Digital Reconstruction of Wanfoge

The ultimate goal of this project was to digitally reinstate two coffered ceilings according to Buddha Hall’s original structure, providing a holistic view of the interiors as they would have been. To achieve that with accuracy, however, we needed to overcome at least two major obstacles. First, having been previously installed in museums, the two coffered ceilings could not be taken down or dissembled for us to scan their exact shapes and measurements. The initial scan work could only capture the intricate carvings and details externally, but not individual timber pieces of its elaborate structure. Second, later temple restorations obscured the traces caused by removing the coffered ceiling from the Buddha Hall’s structure. Instead, we had to investigate the possible positions in the hall and verify how the coffered ceiling could be joined organically with the building structure based on the precise measurements. In what follows, this essay will illustrate the solutions devised to meet the challenges, using the coffered ceiling of the Wanfoge (Ten Thousand Buddhas Pavilion), and now installed on the Chinese Room ceiling at the Nelson-Atkins Museum of Art, Kansas City, as the primary example.
Reimaging Wanfoge’s Coffered Ceiling
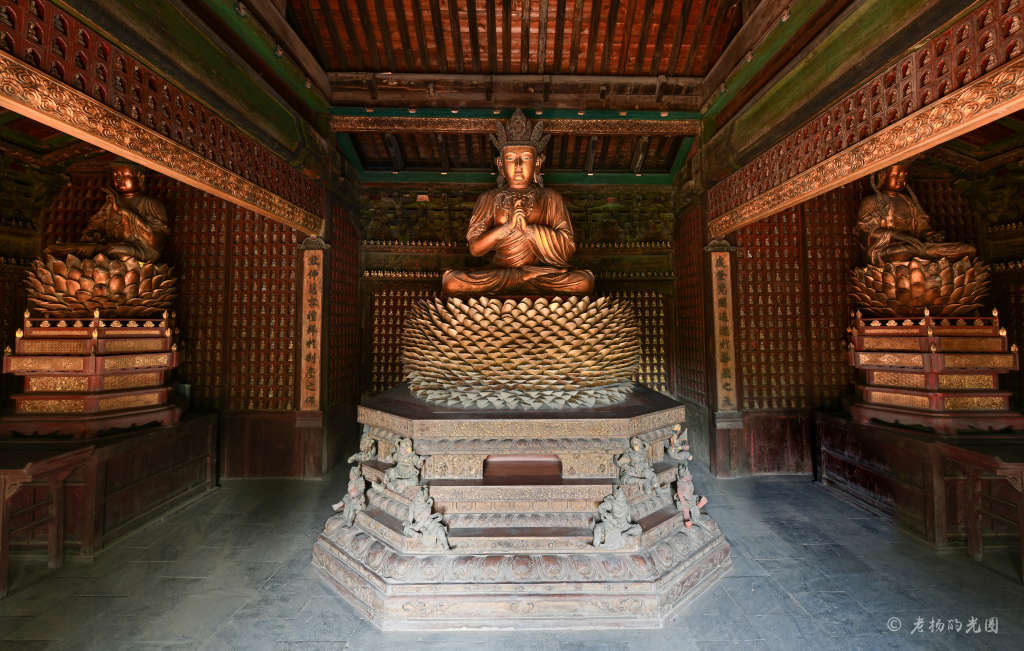
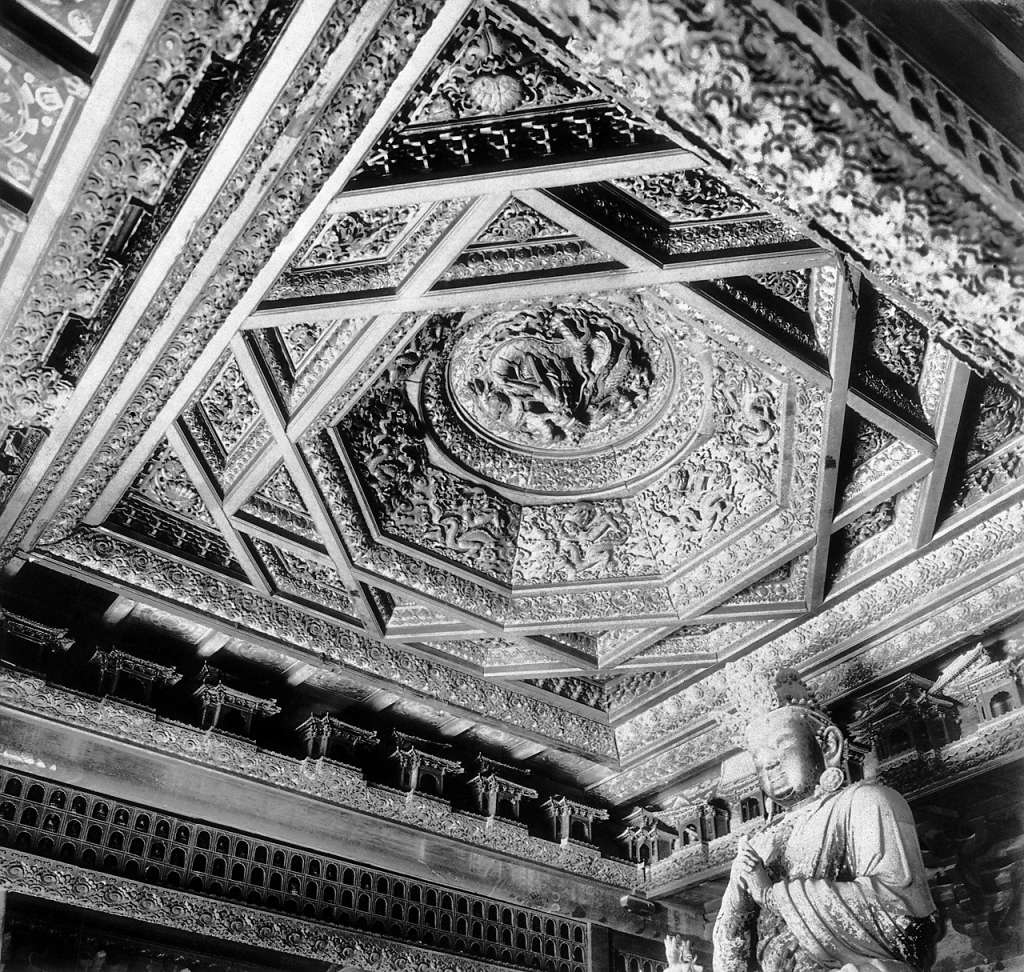
The coffered ceiling was removed from the temple in Beijing in 1931. It has since then been installed and exhibited in Kansas City when the museum opened in Dec. 1933 as one of the key components of its “Chinese Temple” gallery (Fig. 1). About six meters from the floor and lit by soft artificial lights, the coffered ceiling could only be scanned at close range using a scaffold. With its sizable surface, roughly 15 feet by 15 feet, we divided the entire coffered ceiling into 40 scanning areas to ensure no minute detail was left unscanned. Still, the coffered ceiling, shaped like an upturned well, has a depth of more than one meter from the outer frame to the central dragon, presenting considerable challenges (Fig. 2).


The coffered ceiling can be divided into three primary sections (Fig. 3):
-
Square well (fangjing) - the lowest section, comprises a complex timber framework that forms several smaller triangular and diamond-shaped units. The timber framework is structured with an outermost square frame that circumscribes one octagonal frame and two overlapping squares with one rotating 45 degrees.
-
Octagonal well (bajiaojing) - the middle section, comprising eight trapezoids, each carved with a dragon.
-
Round well (yuanjing) - the topmost section, consisting of a framework that makes the transition from the octagonal frame below into a circular one, at the center of which is a ground-facing coiling dragon carved in high relief.

Because of its three-dimensionality and high-relief carvings, the scanner couldn’t reach much of the perforated areas due to the scanning angle constrained by the coffered ceiling’s form. We took as many photos to document the missing areas, and used these in post-production to manually patch in the missing areas as illustrated here (Fig. 4).

However, documenting the coffered ceiling’s carved surface digitally in minute detail doesn’t make it a true 3D model. As the view above the ceiling shows (Fig. 5), the coffered ceiling comprises individual wooden interlocking components of different shapes and measurements. The current installation doesn’t afford any opportunities to scan each component individually. Our only option was to recreate all components and join them together virtually – a task that required us to investigate the coffered ceiling in situ and improvise methods to deduce correct measurements of timber parts.

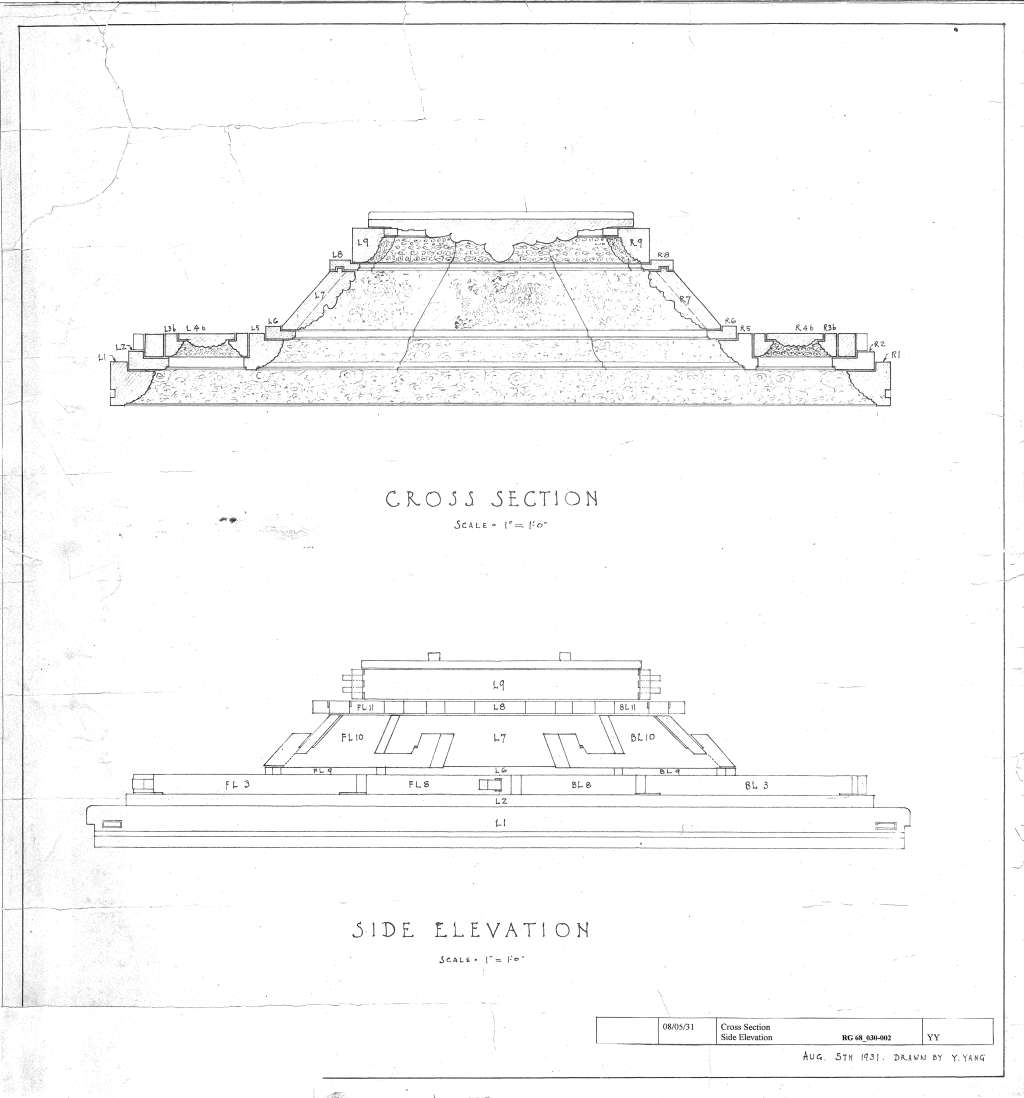
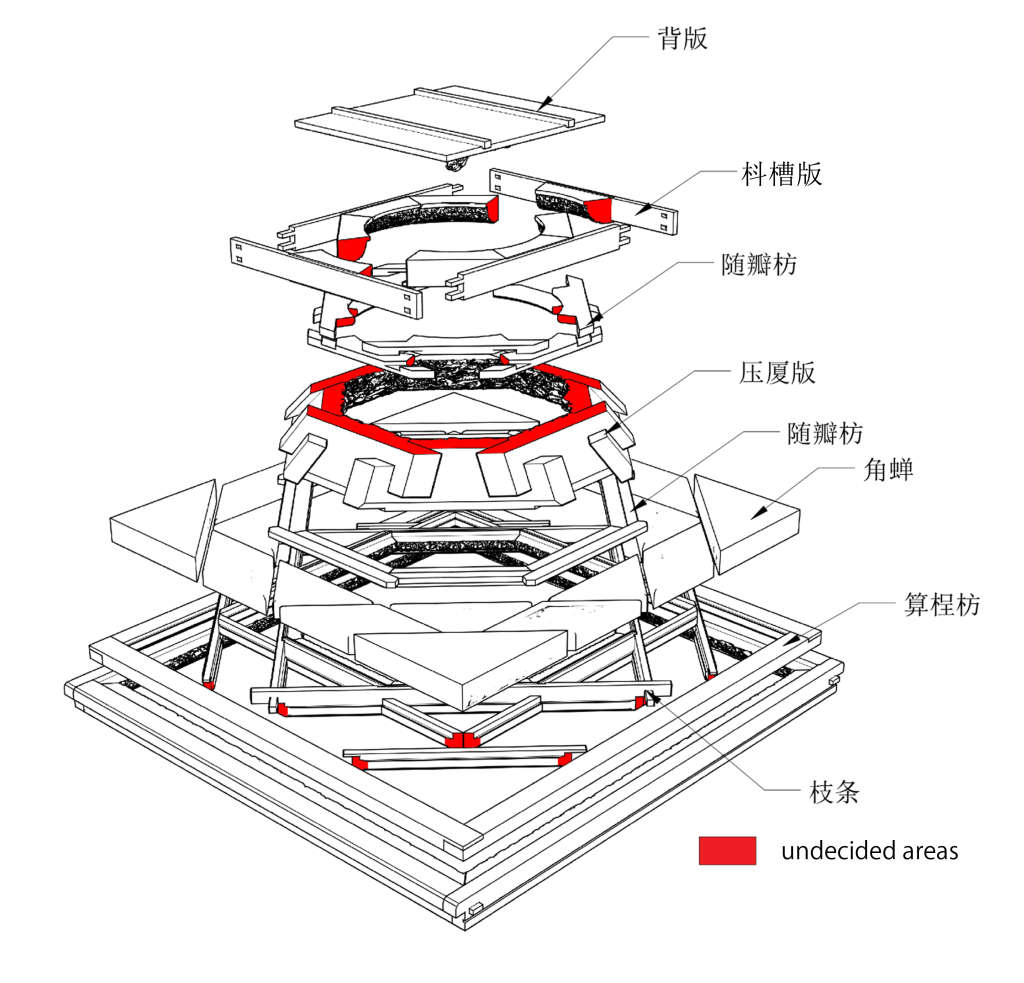
Fortunately, the photos, taken when the coffered ceiling was removed, give us a better understanding of the part of the structure largely hidden from view now (Fig. 6). Two hitherto unpublished diagrams further show how components were fit together in both frontal view and cross-section (Figs. 7-8). With the new evidence, we have been able to recreate all timber components of the coffered ceiling and demonstrate how they are interlocked into the complete artifact. Although there are still some areas where precise details cannot be inferred (marked in red in the illustration) (Fig. 9), the 3D model makes the coffered ceiling, now fixed in its position inside the museum, moveable. This “reimagined” coffered ceiling allows us to reconstruct the Buddha Hall and its interior as it was originally designed (Fig. 10).


A Virtual Reconstruction of Wanfoge
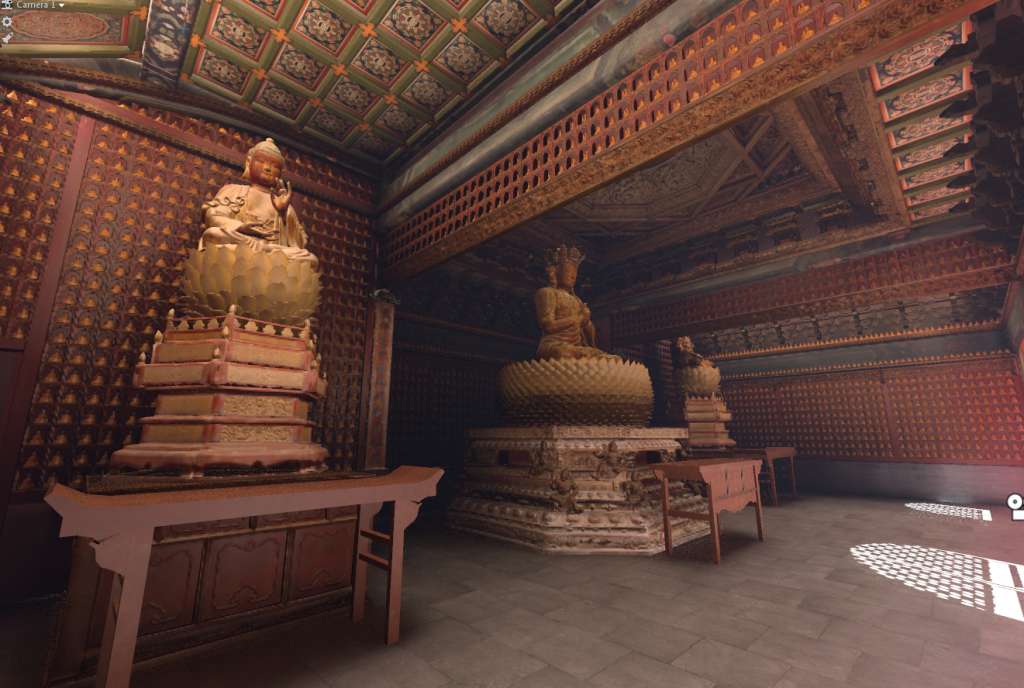
Wanfoge is the second level of the Rulaidian (Hall of Śākyamuni). It has a relatively small interior with three bays across its width, each accommodating one Buddhist statue (Fig. 11). The most prominent of the three, the central Vairocana Buddha, would have been canopied from above by the coffered ceiling, as shown in the photo taken before it was removed (Fig. 12). The photo also indicates a series of 32 miniature timber halls initially installed underneath the coffered ceiling’s outer frame. Without the coffered ceiling, the roof structure is exposed to view. In fact, the rest of the roof structure should also have been covered and concealed by 126 ceiling panels, all painted with mandalas. When the coffered ceiling was detached, the model buildings and ceiling panels were also removed from the structure. In addition to the coffered ceiling, the Nelson still holds 17 of the 32 miniature halls (Fig. 13) and 111 of the 126 ceiling panels in its collection. From the existing building models and ceiling panels, we identified three different types of miniature timber-frame structures: Main Hall (5 bays wide), Subsidiary Hall (3 bays wide), and Corner Structure (3 bays wide). (Fig. 14) We also identified four different shapes of ceiling panels.


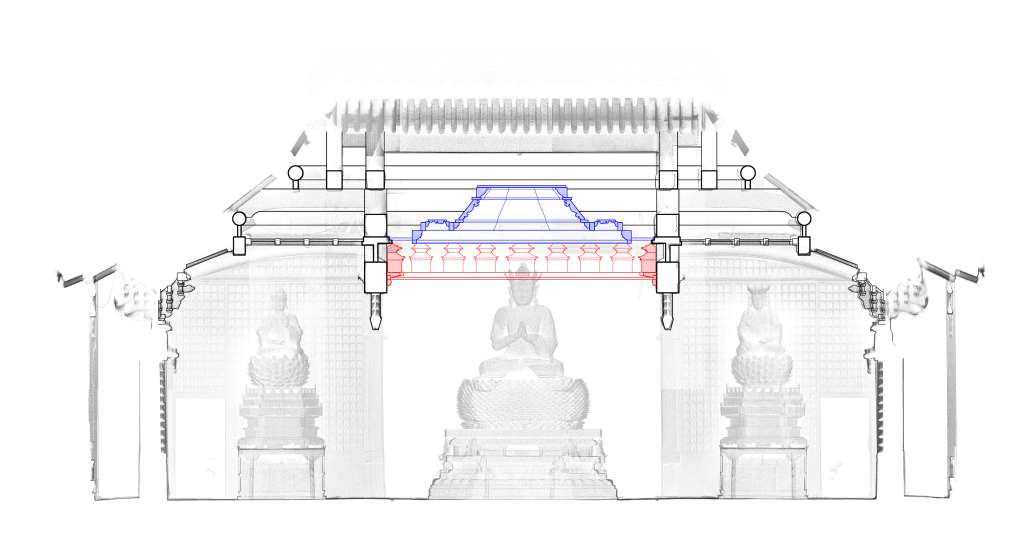
To reinstate all the missing components back into the hall proved to be challenging, given the evidence left to us was largely insufficient. We first scanned the entire interior as it is today. Together with the digital data of the timber frame, we built a 3D model of the Wanfoge with accurate measurements. In the model, it turned out that the depth of the coffered ceiling matches the distance between the front and rear lower roof purlins (xia jinfang) and the coffered ceiling could ledge on the purlins snugly (Fig. 15). However, the coffered ceiling length is shorter than the distance between the two tie-beams across the central bay, creating a gap on each of the two sides. After careful comparisons, we found that each of the gaps affords exactly seven square ceiling panels, together with the coffered ceiling, therefore, covering the roof structure of the central bay.

The miniature buildings, which seem to float around the coffered ceiling’s outer frame, were supported by tie-beams and horizontal boards carved with cloud patterns (yunban) ledged onto the crossbeams (Fig. 16). Excluding the four Corner Structures, each side could fit exactly one Main Hall at the center and six Subsidiary Halls. With the miniature models in place surrounding the Vairocana Buddha, we could then reconstruct the central bay of the interior from the angle the photo was taken in 1931 (Fig. 17).


The arrangement of the ceiling panels in the two flanking bays is the same, with one mirroring the other. The ceiling of each bay consists of 27 square panels that cover the central area, with 15 rectangular panels and four triangular ones forming the slanting surface that boards the central area (Fig. 18). Taken together, the ceilings of the flanking bays create a spatial movement toward the central bay, where the coffered ceiling, surrounded by the rows of miniature halls, occupies the central position and the spatial climatic point (Fig. 19).

Wanfoge in Virtual Reality
With the virtual imaging technology, the 3D model is built as a close simulation of the Wanfoge interior with exact measurements and accuracy of all its timber-frame structure, textual surfaces, decorative components, and objects in its space. However, it creates a nonexistent virtual reality by reinstating the coffered ceilings, miniature halls, and ceiling panels that have been detached from Wanfoge since the 1930s. The Wanfoge in virtual reality thus provides an opportunity for us to enter and see the “complete” interior and experience its space as it was experienced in history, restoring an understanding of its iconography and religious significance that could otherwise no longer be comprehended completely (Fig. 20).